4x4 keypad interfacing with PIC16F877A microcontroller and mikroC compiler
In this tutorial we will learn how to interface keypad with PIC16F877A microcontroller. In this project I am use 4x4 matrix keypad.
You can watch this video or read the written tutorial below.
MATRIX KEYPAD
Before I interface the keypad with PIC16F877A microcontroller , frist we need to understand how to working matrix keypad.
Keypad is set of button. It contain digits,symbols&alphabetical letters. It can be (4x4),(4x3) & (3x2). 4x3 it means 3 column and 4 row. Matrix keypads are commonly used in calculator , digital scale, security systems ,electronic device etc. Matrix keypad is array of push switch. Push button switch leg are connected to columns and rows. 4x4 matrix keypad contain (4*4)=16 push button switch. If we are use 3x4 matrix there are (3*4)=12 push button switch. 4x4 matrix keypad has (4+4)=8 pin connection and 3x4 matrix keypad (3+4)=7 pin connection.
4X4 MATRIX KEYPAD STRUCTURE
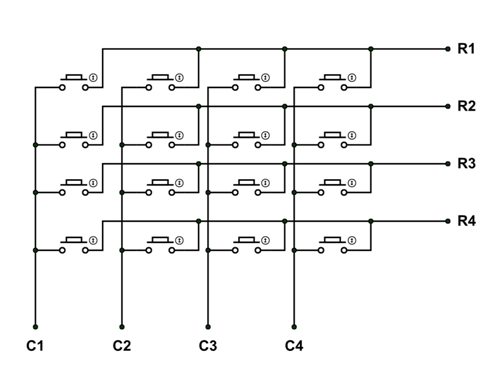
When press the any key than any column & row are connected each other at a time. Than current flowing column to row.
Circuit Diagram
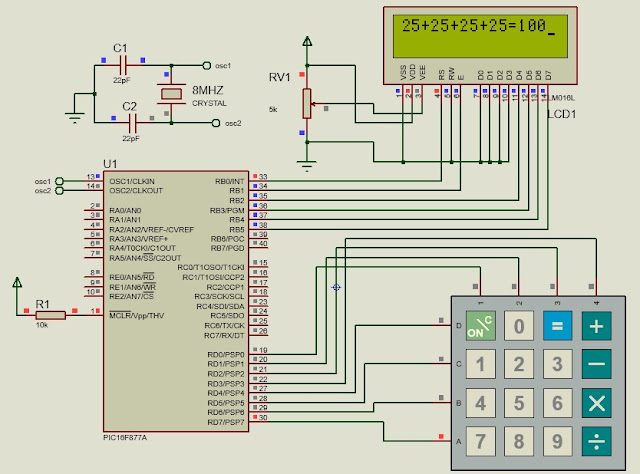
In this project we are use Mikro C Pro For PIC Compiler.. MikroC provide 4x4 matrix keypad library and LCD library
Project Code
unsigned short kp;            //  kp is  code variable
// keypad module connections
char keypadPort at PORTD;
// End keypad module connections

// Lcd module connections
sbit LCD_RS at RB0_bit;
sbit LCD_EN at RB1_bit;
sbit LCD_D4 at RB2_bit;
sbit LCD_D5 at RB3_bit;
sbit LCD_D6 at RB4_bit;
sbit LCD_D7 at RB5_bit;

sbit LCD_RS_Direction at TRISB0_bit;
sbit LCD_EN_Direction at TRISB1_bit;
sbit LCD_D4_Direction at TRISB2_bit;
sbit LCD_D5_Direction at TRISB3_bit;
sbit LCD_D6_Direction at TRISB4_bit;
sbit LCD_D7_Direction at TRISB5_bit;
// End Lcd module connections
void main() {
     Lcd_Init();                                              // initialize Lcd module
     Keypad_Init();                                           // initilize keypad module
     Lcd_Cmd(_LCD_CLEAR);                                     // Lcd clear
     Lcd_Out(1,3, "WELCOME TO");
     Lcd_Out(2,1, "MINA TECHNOLOGY");
     delay_ms(1000);                                          // 1s delay
     Lcd_Cmd(_LCD_CLEAR);                                     // clear Lcd
     while(1){                                                // loop started
              kp = 0 ;                                        // Reset the key code variable
              // wait for key to be pressed and relised
              do
                kp = Keypad_Key_Click();                      // Store key code in kp varible
                while(!kp);

              switch(kp){
                         case 1 :  Lcd_Cmd(_LCD_CLEAR); break ;     // Clear Lcd display
                         case 2 :  kp = '0' ; break ;               // 1
                         case 3  : kp = '='; break ;                // =
                         case 4  : kp = '+' ; break ;               // +
                         case 5  : kp = '1' ; break ;               // 1
                         case 6  : kp = '2' ; break ;               // 2
                         case 7  : kp = '3' ; break ;               // 3
                         case 8  : kp = '-' ; break ;               // -
                         case 9  : kp = '4' ; break ;               // 4
                         case 10 : kp = '5' ; break ;               // 5
                         case 11 : kp = '6' ; break ;               // 6
                         case 12 : kp = '*' ; break ;               // *
                         case 13 : kp = '7' ; break ;               // 7
                         case 14 : kp = '8' ; break ;               // 8
                         case 15 : kp = '9' ; break ;               // 9
                         case 16 : kp = '/' ; break ;               // '/'
                         }
              Lcd_Chr_Cp(kp);                                      // print lcd with cursor position
              }


}
Download free source code

Post Comments